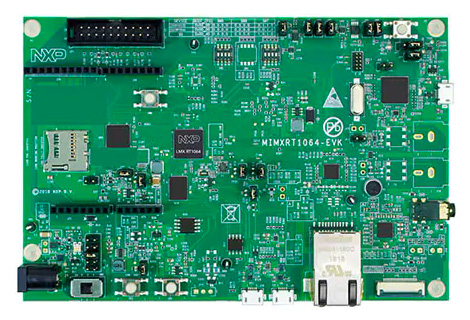
MIMXRT1064_EVK

The port for this board is experimental. It is made based on the documentation, but was not yet tested.
Installation instructions
Firmware installation options
There are two ways to load the MicroPython firmware to the device:
- Load the MicroPython firmware directly to the device. The MicroPython firmware files for that method have the extension .bin or .hex and are available at the MicroPython download site.
- Install a resident UF2 bootstrap loader to the device first and use that later for loading MicroPython. The MicroPython firmware files for that method have the extension .uf2 and are available at the MicroPython download site. The UF2 bootstrap loader can be obtained from the site https://github.com/adafruit/tinyuf2. Open the recent release page and get the version of the bootloader for your board. If there is no specific bootloader for a specific board, get versions for the respective imxrt10xx-evk board. The file with the .bin or .hex extension is the one to be installed first.
Direct loading of MicroPython or installation of the UF2 bootloader
The MicroPython firmware or the UF2 bootstrap loader can be loaded to the MIMXRT development boards in various ways. The most convenient one is using the built-in support MCU. When a PC is connected to the debug USB port, a drive icon will appear. Firmware can be uploaded to the board by copying it to this drive. The copy and flashing will take a few moments. At the end of the upload, the drive icon will disappear and reappear again. Then the reset button has to be pushed, which starts the MicroPython firmware.
Depending on the power jumper settings, both the debug USB and OTG USB port have to be powered during firmware upload.
You may as well load the firmware using the JLink port or openSDA interface with the appropriate tools. For more options, consult the user guide of the board.
Installing the MicroPython firmware using the UF2 bootloader
When using the UF2 bootloader, the OTG USB port will be used. Once the UF2 bootloader is installed, it has to be started to upload MicroPython.The methods to start the bootloader are:
- Push reset twice.
- Call machine.bootloader() e.g. from REPL.
- Switch the USB port shortly to 1200 baud and back. That requires MicroPython to be installed.
If there is no valid Firmware on the device, the bootloader will start automatically. Once it's started, a drive ICON will appear. The MicroPython firmware file with .uf2 extension must then be copied to that drive. A LED on the board may start flickering, indicating that the upload is ongoing. Once the upload is complete, the drive icon will disappear. Wait until the LED stops flickering. In rare cases there may be an error message coming up, especially when there are only few or no changes in the firmware file. Then just repeat the copy.
Firmware
Releases
Preview builds
These are automatic builds of the development branch for the next release.